Your first job
Training walkthrough · start here · any machine
What this is
One real job, start to finish: artwork in, part out. Not a tour of the menus — the menus make sense once you have done this once, and not before.
By the end you will have sent a job to a laser and will understand the one idea ALPS is built around, which is colour.
The one idea: colour decides what happens
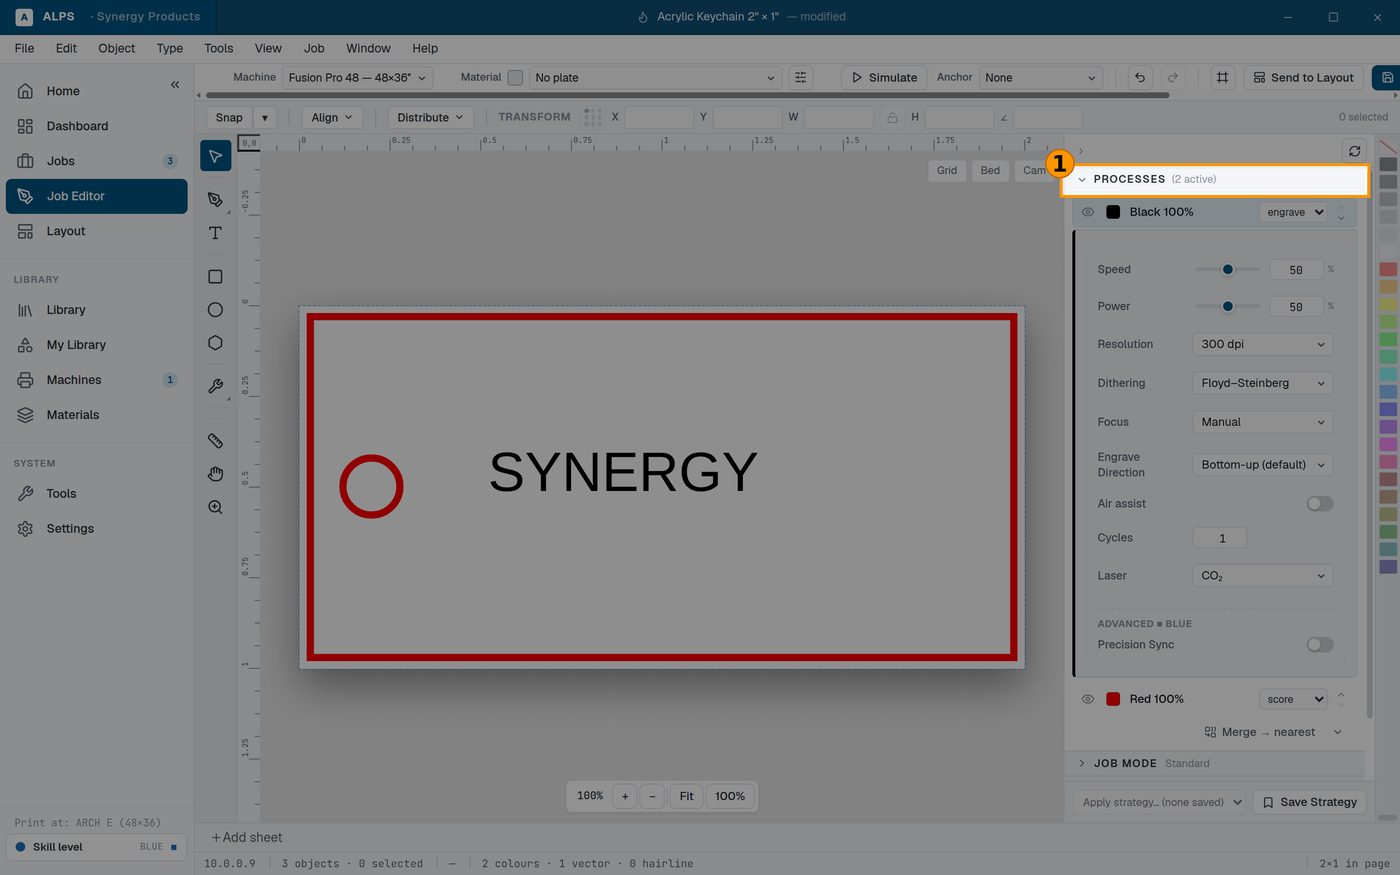
Two colours in the artwork became two processes on the right — black set to engrave, red to cut. That is the whole idea, and everything else in ALPS follows from it.
⭐ This is the thing to understand, and everything else follows from it.
ALPS does not ask you "is this a cut or an engrave?" per shape. It looks at the colour of each line and fill in your artwork, and each distinct colour becomes a process — its own pass, with its own speed, power and settings.
So the way you control a job is by controlling the colours in your artwork:
- red outlines → one process
- black fills → another process
- blue outlines → a third
Draw it that way and the job builds itself. This is also why a file that looks right on screen can behave oddly — if everything is the same colour, it is all one process and gets one set of settings.
Step by step
1. Bring the artwork in
Import artwork… — SVG, PDF, DXF, or an image.
If nothing is loaded the editor says No artwork loaded, which is the state to expect on a fresh start.
⚠ Vector for cutting, image for engraving. A photograph of a shape is not a cut line, however crisp it looks. If you want it cut, it has to be a vector.
2. Say which machine
Pick the Machine. This matters before you position anything, because it sets the bed size — the artboard you are placing artwork on is that machine's bed.
You can leave it on Any machine while you are drawing, but choose the real one before you position for real.
3. Choose the material
Choose a material… and pick a Material preset. This fills in the settings for each process, so you are starting from something that has been run rather than from zero.
⚠ If your material is not in the list — or the preset gives a poor result — run
Tools ▸ Material Test first. Twenty minutes on a test grid beats an afternoon
of ruined blanks. See material-test.md.
4. Check the processes
Open Processes. You should see one entry per colour in your artwork.
This is the moment to confirm ALPS understood the file the way you meant it:
- More processes than expected? Your artwork has more distinct colours than you thought — very common with files exported from Illustrator or Corel.
- Only one process? Everything is the same colour. Go back and recolour what should be cut versus engraved.
- Order matters. Processes run top to bottom. Engrave before you cut — cut a part free first and it can shift, and everything after that is out of position.
5. Position it
Auto-fit puts the artwork on the sheet for you. If you have a camera machine
with a calibrated bed camera, turn the overlay on and place the artwork on the real
material you can see — that is the whole point of calibrating it
(bed-camera-calibration.md).
6. Send it
Send to Laser. The job goes to the machine's queue; you start it at the machine, as normal.
⚠ Sending is not starting. The job lands in the machine's queue; someone at the machine presses go. That is how it works today — remote starting needs hardware that is not fitted yet, and is a planned feature rather than a thing we have decided against.
The check worth doing every single time
Before you send, ask: which process runs first, and would I be happy if that were the only one that ran?
It catches the two expensive mistakes at once — cutting before engraving, and sending a job where the settings landed on the wrong process. Both are invisible on screen and obvious in the material.
When it goes wrong
| what you see | what it usually is |
|---|---|
| "No artwork loaded" | nothing imported yet, or the import failed silently — try re-importing |
| everything is one process | your artwork is all one colour |
| the part is engraved but not cut | the cut lines are not vectors, or their colour has no process |
| the part shifted mid-job | it was cut free before the engraving finished — reorder the processes |
| it will not send | check the machine is selected, reachable, and switched on at the panel |
Where to go next
- Material Test (
material-test.md) — before you commit good material to anything. - Bed Camera Calibration (
bed-camera-calibration.md) — if your machine has a camera. It makes the overlay trustworthy for placement. - Fixture Maker (
fixture-maker.md) — once you are running the same parts repeatedly. - 3D Engraving (
3d-engraving.md) — fiber galvo machines.