Section 13 · Projects
Seven real jobs, start to finish. These are the things people actually buy a laser to make.
⭐ Every project here has a matching blank in the Library. Go to Library, find it under Starter Projects, and press Use — you get an artboard already the right size, with the engrave-safe area marked, and Epilog's published starting settings attached. You are not starting from an empty bed.
⚠ The settings that ship with those blanks are Epilog's published values for a 60 watt CO2 source. If your machine is a different wattage they are the wrong starting point — the settings tables in your Epilog manual have a column per wattage. Either way, run a Material Test before committing good stock. Every number in this section is a starting point, not an answer.
⛔ Engrave settings only. A Library blank carries one operation's settings, so where a project also cuts, the cut numbers are in the project below and you enter them yourself. That is deliberate — publishing the engrave speed as though it were a cut setting would ruin material.
13.1 Acrylic keychain — the one to do first
Library: Acrylic Keychain 2″ × 1″ · Material: 3 mm cast acrylic · Time: ~20 minutes
This is the best first project: it uses both operations, the result is genuinely sellable, and the material is cheap enough to get wrong twice.
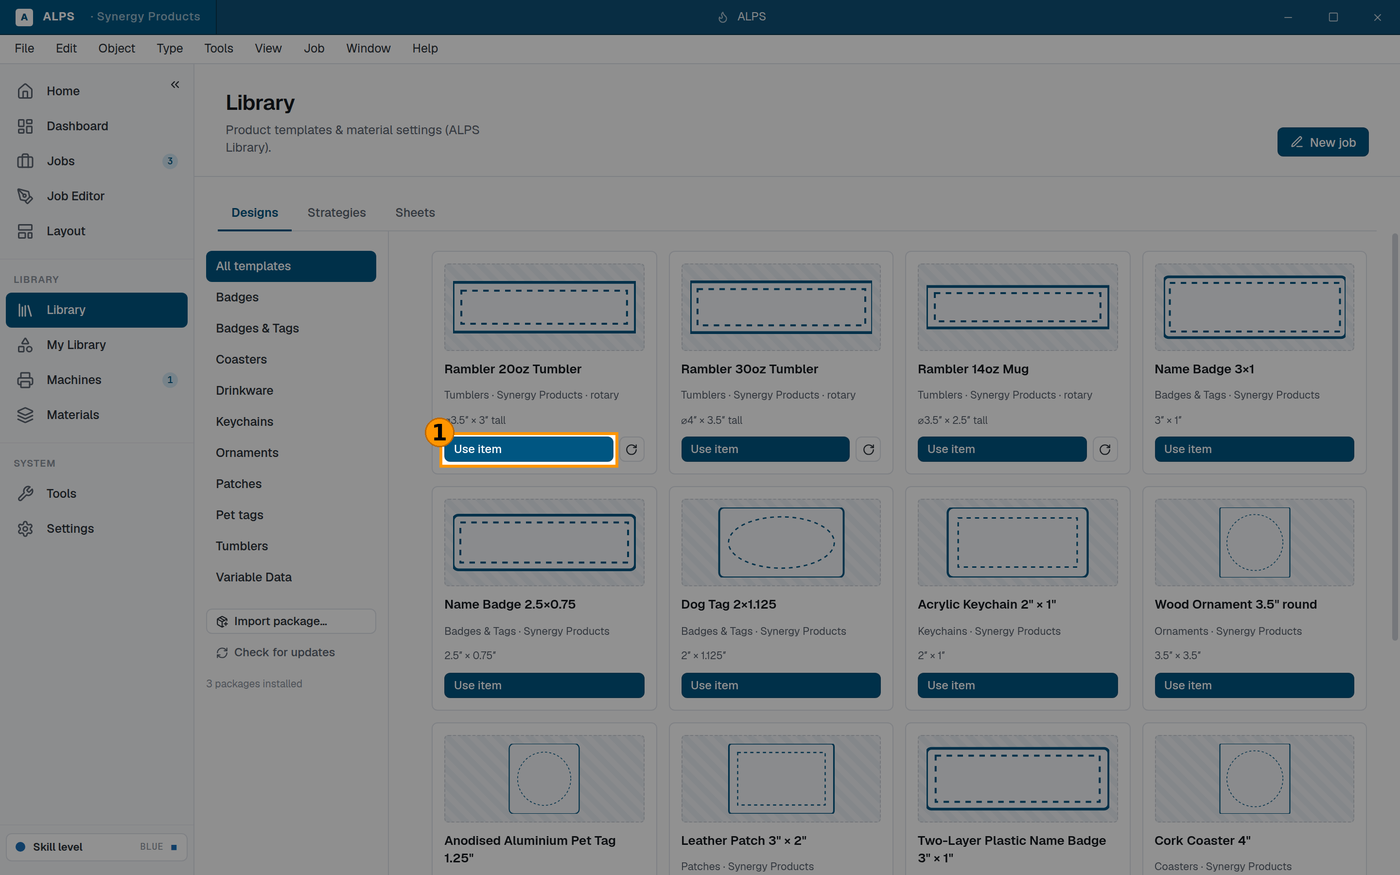
Library ▸ Starter Projects ▸ Acrylic Keychain ▸ Use.
Use item — opens an artboard already the size of the blank
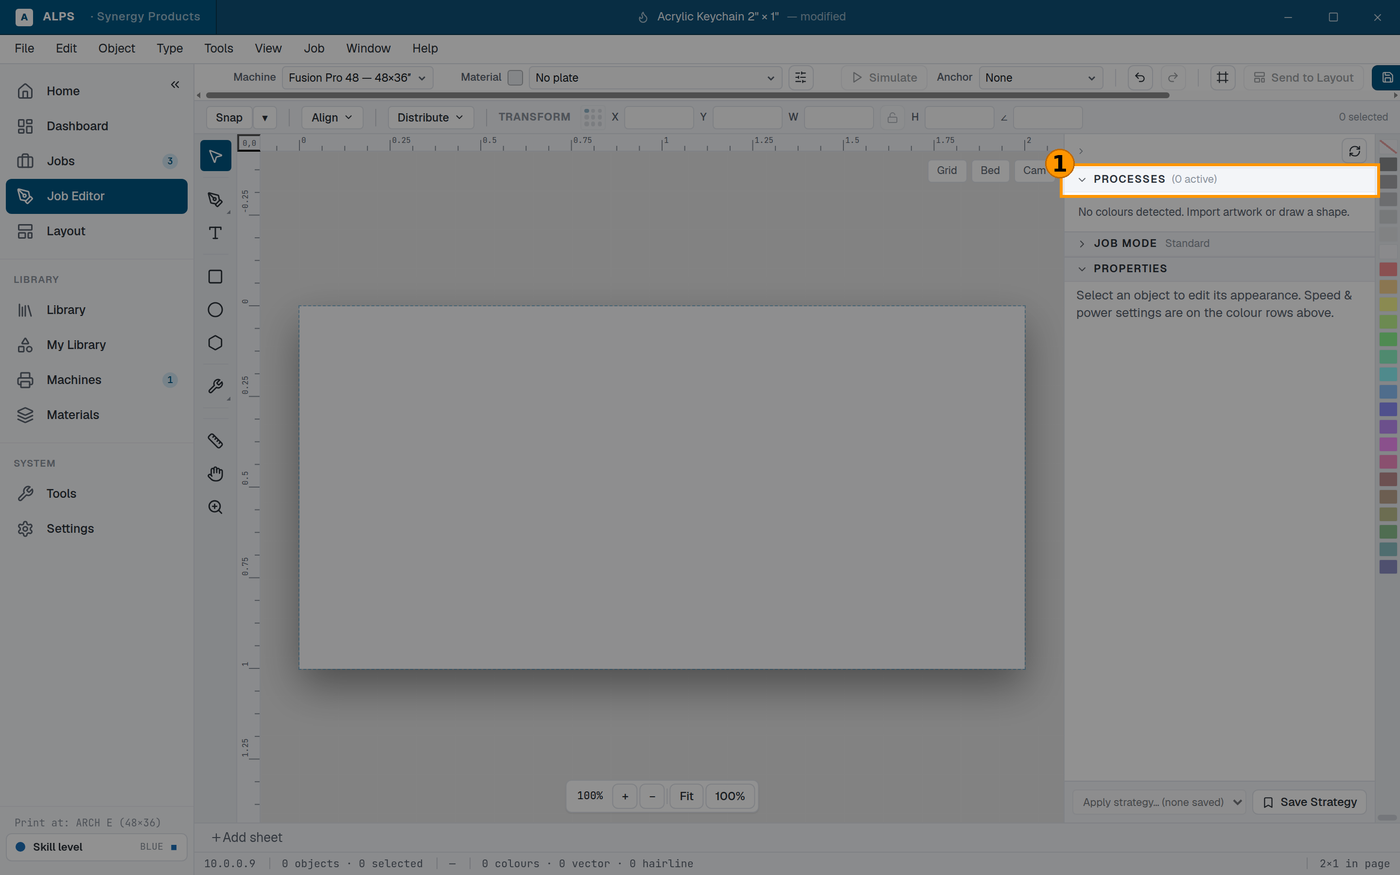
The artboard that opens is the keychain — 2″ × 1″, not your whole bed:
One process so far, because there is only one colour on the page
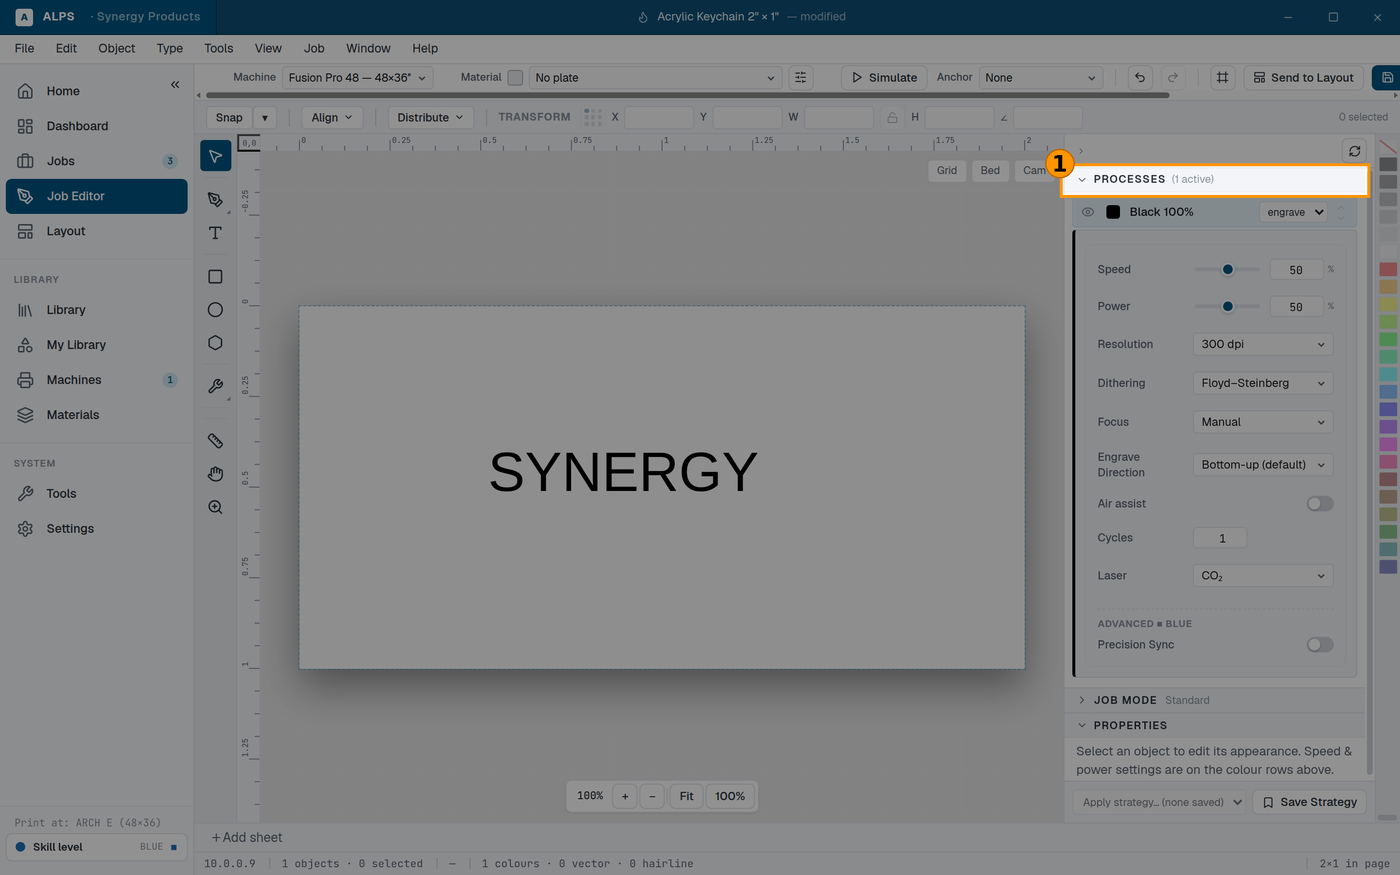
Put your artwork or text inside the marked zone.
Text placed inside the zone — outside it is off the physical blank
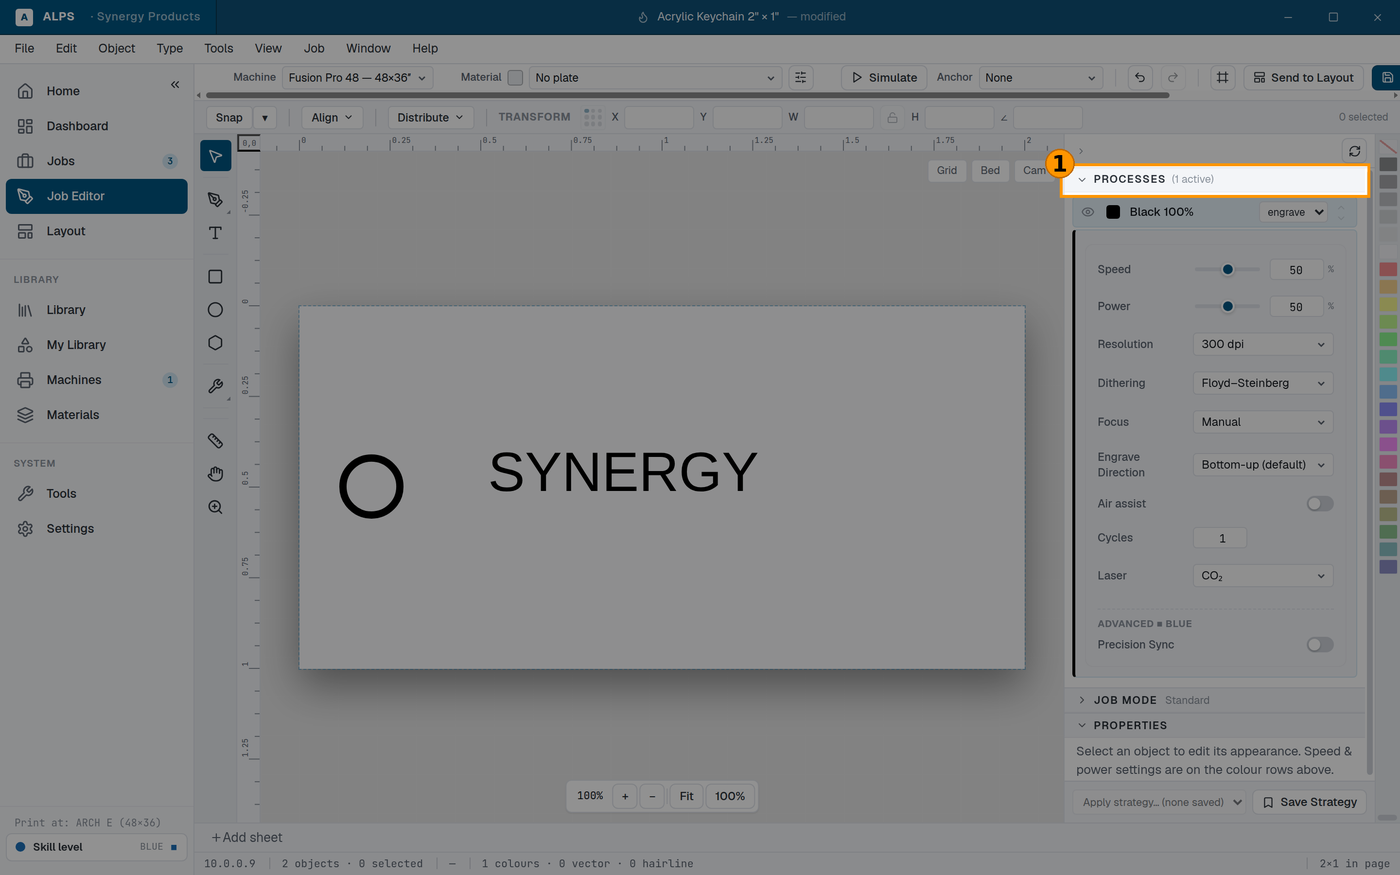
Add a hole for the ring — a 4 mm circle, at least 3 mm in from the edge.
4 mm circle, 3 mm in from the edge — closer and the ring tears out
Draw the outline of the keychain, or use the artboard edge.
⭐ Colour them differently. The engraving one colour, the outline and the hole another. This is what makes them separate processes — see Your first job.
TWO colours means TWO processes — this is how you say what cuts and what engraves
Set the engrave process to the blank's settings. Set the cut process to speed 20, power 100, frequency 100 (Epilog's 1/8″ acrylic cutting figure at 60 W).
⛔ Check the order: engrave first, cut last. Cut it free before engraving and the part moves.
Send it.
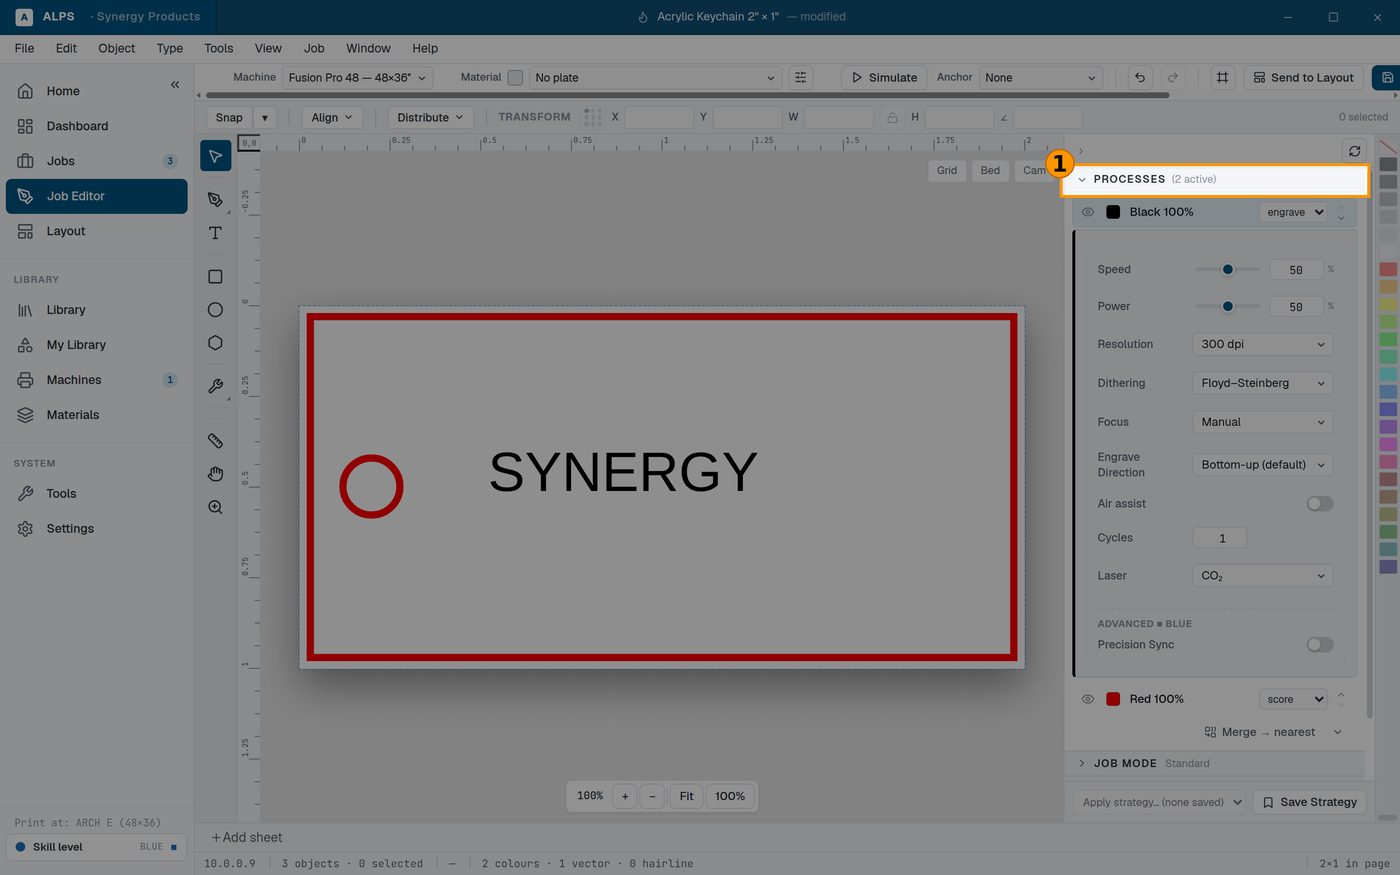
⭐ Use cast acrylic, not extruded. Cast engraves a bright frosted white — the contrast that makes the piece look finished. Extruded engraves grey and muddy. It is the single biggest quality decision in this project, and it happens at the supplier, not the laser.
⚠ Leave the protective film on while cutting, and peel it after. It keeps the surface clean of residue.
⛔ Acrylic is the most flammable thing most shops cut. Epilog names it specifically. Use air assist, and do not walk away.
13.2 Wood ornament — the seasonal earner
Library: Wood Ornament 3.5″ round · Material: 3 mm birch ply · Time: ~25 minutes
Q4 volume for most shops. Cut and engrave in one job, and they nest well so you make dozens at once.
- Use the ornament blank.
- Artwork inside the round zone; add a hanging hole near the top.
- Engrave: speed 60, power 100, 500 DPI. Cut: speed 25, power 100, frequency 10 (Epilog's 1/8″ wood figures at 60 W).
- Engrave first, cut last.
⭐ Once one is right, use Nesting to fill the sheet. That is the difference between making an ornament and making a hundred.
⚠ Wood is not consistent. Grain, moisture and even which side of the sheet faces up change the result. Test on the same sheet you will run, not on a piece from last month.
⭐ Masking tape over the surface before engraving stops the smoke staining around the engraving. Peel it after. On light woods this is the difference between crisp and grubby.
13.3 Anodised aluminium pet tag — highest margin per minute
Library: Anodised Aluminium Pet Tag 1.25″ · Material: pre-cut anodised blanks · Time: ~5 minutes
No cutting — a CO2 laser does not cut aluminium. You buy the blanks pre-cut and pre-drilled and you only engrave, which is why these are so quick and so profitable.
- Use the pet tag blank.
- Name on one side, phone number on the other. Keep text inside the zone.
- Engrave at speed 100, power 40, 500 DPI (Epilog: anodised text is best at 500 DPI).
- Send. Flip, and run the second side.
⭐ The laser removes the anodised layer, revealing bright aluminium underneath. So you are marking, not cutting — which is why it is fast and why it will not wear off.
⚠ Read the text back at arm's length before running fifty. Small type on a small tag is where legibility is won or lost, and a phone number that cannot be read is a tag that failed at its only job.
⭐ For a batch of different names, this is the project to pair with Variable Data — one job, a spreadsheet of names, every tag different.
13.4 Leather patch — the one people ask for now
Library: Leather Patch 3″ × 2″ · Material: veg-tan leather · Time: ~20 minutes
Hat and bag patches. Fashionable, and the material is forgiving.
- Use the patch blank.
- Engrave: speed 100, power 40, 500 DPI. Cut: speed 20, power 100, frequency 50 (Epilog's 1/8″ leather figures at 60 W).
- Engrave first, cut last.
⭐ Genuine veg-tan leather darkens beautifully. Chrome-tanned behaves differently and bonded "leather" is largely plastic — it smells wrong, cuts badly, and can release chemicals you do not want. ⛔ Never laser anything you cannot identify as real leather.
⚠ Run the exhaust hard. Leather smells strongly, and the smell carries into the shop and into everything else you make that day.
13.5 Two-layer plastic name badge — the bread-and-butter job
Library: Two-Layer Plastic Name Badge 3″ × 1″ · Material: two-layer engraving plastic · Time: ~15 minutes
Conference badges, office door signs, equipment labels. Two-layer plastic is a coloured surface over a different-coloured core — engrave through the top and the core shows.
- Use the badge blank.
- Name and title inside the zone.
- Engrave: speed 100, power 30, 500 DPI. Cut 1/16″: speed 20, power 40, frequency 100.
- ⚠ Engrave only just through the top layer. Too much power cuts into the core and the letters lose their clean colour edge. This material rewards less power than feels right.
⭐ For a run of names, use Variable Data. Then Mark Verification in batch mode reconciles what you engraved against the list — which catches the name that got skipped, the failure a badge-by-badge check cannot see.
⛔ Confirm the material is not PVC. Some cheap engraving plastic is, and PVC releases chlorine gas that is dangerous to breathe and corrodes the machine from the inside. If the supplier cannot tell you, do not run it.
13.6 Cork coaster — a good photo-engraving first attempt
Library: Cork Coaster 4″ · Material: 4″ cork coasters · Time: ~10 minutes
- Use the coaster blank.
- For a photo, run it through Image Prep first — start on One Click.
- Engrave at speed 100, power 40, 500 DPI.
⭐ Cork is forgiving and cheap, which makes it the right material to learn photo engraving on before you try it on something expensive.
⚠ Cork varies a lot between batches. Density and colour change how it takes the engraving, so test when you open a new box.
13.7 Pint glass — your first rotary job
Library: Pint Glass 16oz · Material: a plain 16 oz pint glass · Time: ~30 minutes
⚠ Do the Rotary Test Pattern first. Rings tell you instantly whether the diameter is right; a stretched logo does not. Twenty minutes there saves a box of glasses.
- Mount the glass in the rotary.
- Use the pint glass blank — the artboard is already the unwrapped surface (glass height across, circumference top-to-bottom — the glass lies sideways in the rotary, so the wrap runs vertically in the document), and rotary is prefilled.
- Artwork inside the zone.
- Engrave at speed 60, power 100, 500 DPI (Epilog's glass figure at 60 W).
⭐ Two tricks from Epilog's own manual, and they genuinely work: convert the artwork to about 80% grey rather than solid black, and use Jarvis dithering. Both spread the heat out. You can also cover the glass with a thin layer of dish soap to diffuse heat further.
⚠ Glass chips rather than engraves — you are creating a field of tiny fractures, which is why it goes white. Too much power gives a rough, flaky finish rather than a deeper one. If it looks bad, try less.
⚠ Measure the diameter where the artwork sits, not at the widest point. A pint glass tapers.
Where to go next
| you want to… | read |
|---|---|
| make a hundred instead of one | Nesting (Section 10), and Fixture Maker |
| put a different name on every part | Variable Data (Section 10) |
| get the settings right on a new material | Material Test |
| make a photo look good | Image Prep and Dithering Comparison |
| prove every engraved code reads | Mark Verification |