Layout — ganging several jobs onto one sheet
The Layout entry on the rail · ■ Blue
What it does
Nesting packs copies of one job onto a sheet. Layout packs several different jobs onto one sheet — three customers' work on the same piece of acrylic, cut in one run.
⭐ This is where the money is on sheet goods. A sheet cut at 45% utilisation and one cut at 80% cost exactly the same to buy. The difference is offcut.
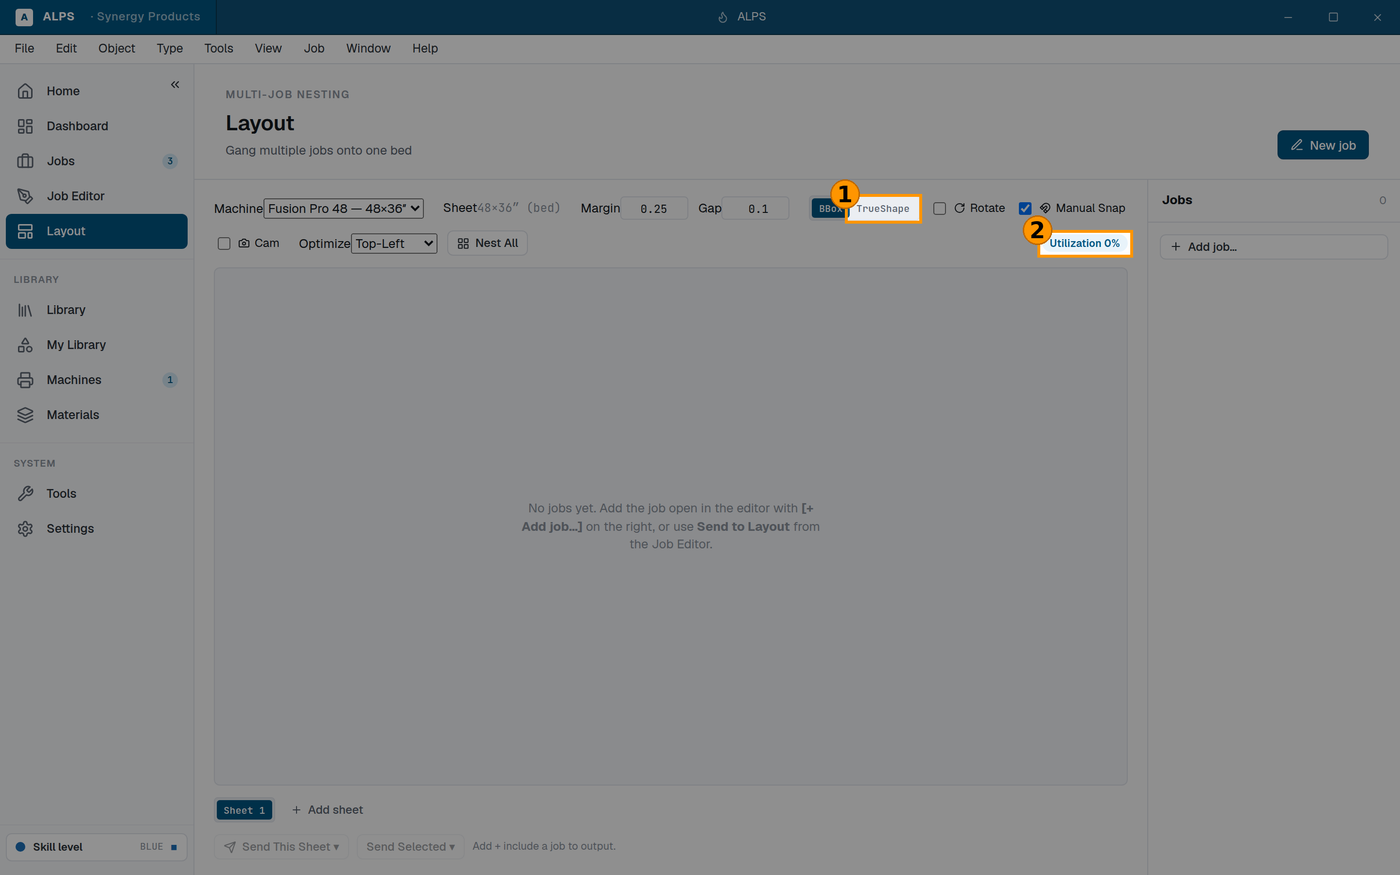
① TrueShape uses the real outline — BBox reserves the empty corners of a bounding box ② Utilization is the number to act on: low, and another job rides free
Getting jobs onto the sheet
Two ways in:
- Add job… on the right, which adds the job currently open in the editor.
- Send to Layout from the Job Editor's toolbar.
The empty sheet tells you both, which is worth knowing because neither is obvious from the Layout screen alone.
The controls that decide how well it packs
Machine sets the Sheet size — it follows the machine's bed.
| control | what it does |
|---|---|
| Margin | clear space kept at the sheet edge (default 0.25″) |
| Gap | space kept between parts (default 0.1″) |
| BBox / TrueShape | ⭐ the setting that matters most — see below |
| Rotate | may parts be turned to fit |
| Manual Snap | parts snap when you drag them by hand |
| Optimize | the packing strategy — Top-Left by default |
| Nest All | pack everything now |
⭐ BBox versus TrueShape
BBox treats every job as the rectangle that contains it. TrueShape uses the actual outline.
For rectangular parts they give the same answer. For anything else — an L-shape, a circle, a letter, a part with a big notch — TrueShape packs dramatically tighter, because BBox reserves the empty corners of the bounding rectangle as though they were solid.
⚠ TrueShape is slower to compute. On a big sheet with many odd shapes, give it a moment rather than assuming it has stalled.
Margin and Gap are not the same thing
Margin is the edge; Gap is between parts. ⚠ Gap is not optional on a cut job: parts sharing an edge fuse, char, or tear when you break the sheet out. The default 0.1″ exists for that reason.
⭐ If you are engraving only, gap can go much smaller. If you are cutting, leave it.
Utilization
The Utilization percentage is the whole point of the screen. It tells you how much of the sheet you are actually using.
⭐ Use it as a decision, not a score. If utilisation is low and you have another job waiting, add it before you cut — the second job is effectively free. If it is high, cut.
Sheets
Add sheet gives you another. Parts that do not fit on sheet 1 go on sheet 2, and each sheet is its own run.
Sending
- Send This Sheet — everything on the sheet you are looking at.
- Send Selected — only the jobs you have picked.
⚠ "Add + include a job to output" is the app telling you a job is on the sheet but not marked for output. A job can sit in the layout without being sent — useful while you are arranging, and confusing if you do not know it is a state.
⛔ Before you cut a ganged sheet
- Check the process order across all the jobs, not within each one. Engraving on job C still has to happen before job A is cut free, or the sheet moves under it. See Section 6.4.
- One material. Everything on the sheet gets the same material and settings, so gang jobs that share a material — not just jobs that happen to be waiting.
- ⚠ A ganged sheet is one failure away from wasting three customers' parts rather than one. Utilisation is worth having; so is not putting a risky first-run job on the same sheet as work you have already promised.
Related
- Nesting (Section 10.3) — many copies of one job, inside the Job Editor.
- Sending to the laser — what happens once the sheet is sent.