Section 4 · How ALPS thinks
Four ideas. Everything else in the application follows from them, and none of them takes long to explain.
4.1 Colour decides what happens
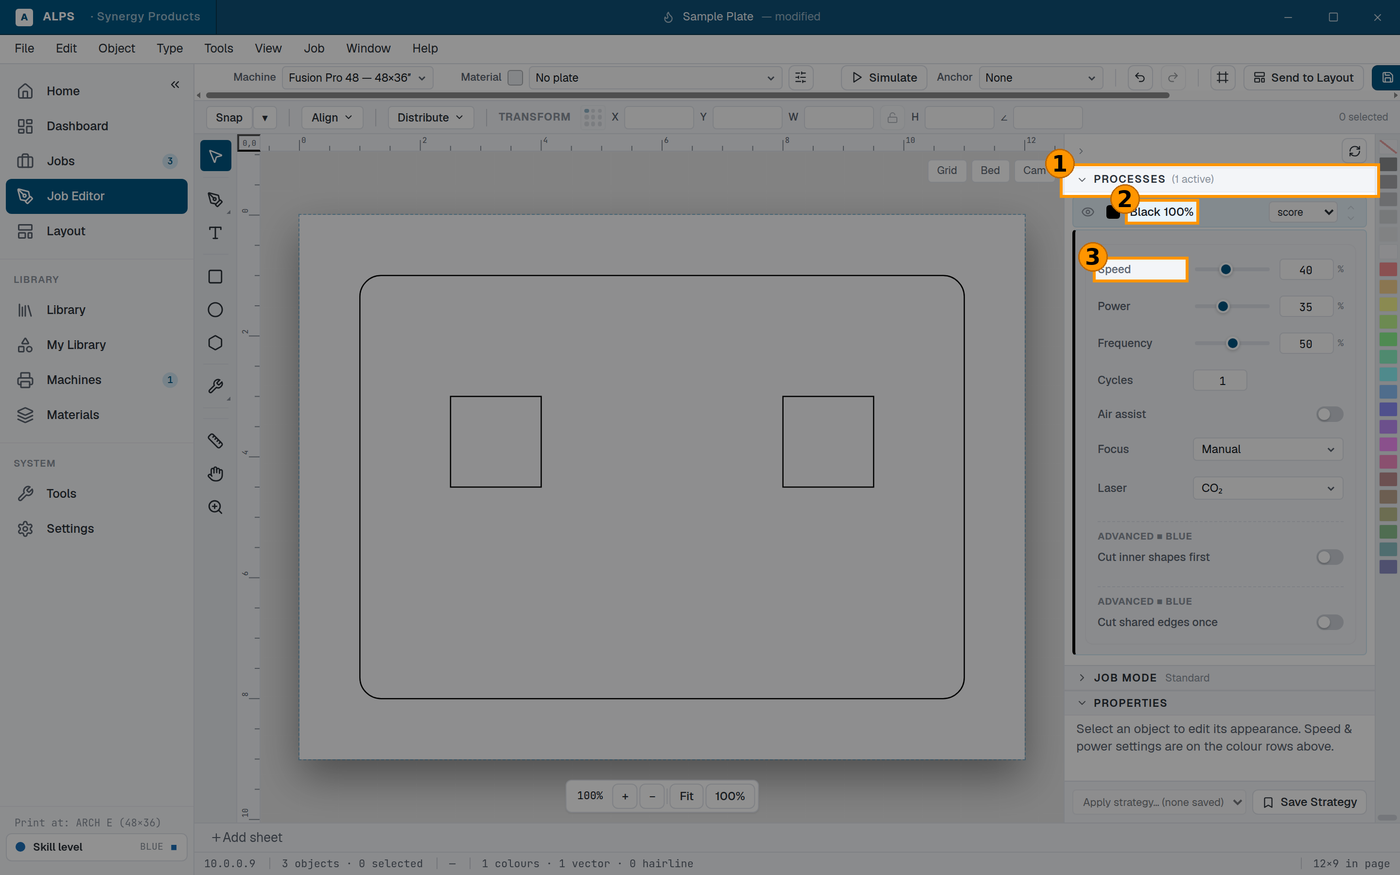
① The process list — one row per distinct colour in your artwork ② This row IS the black artwork — and the dropdown beside it says what that colour DOES: score, cut or engrave ③ Speed, power and frequency belong to the colour, not the shape
ALPS builds one process per distinct colour in your artwork.
Not one per shape, not one per layer — one per colour. Two shapes sharing a colour are one process and get one set of settings. Two shapes in colours that merely look similar are two processes.
⭐ This is the idea the whole application is built on. Once you have it, the process list stops being mysterious: it is simply a list of the colours you used.
⛔ It is also the single most common confusion on the support line — "everything came out as one setting" is always a single-coloured file. See Your first job.
4.2 Processes run top to bottom
The order in the list is the order the machine runs them.
⛔ Engrave before you cut. A part cut free can move, and everything after that lands wrong. This ruins parts in a way that looks like a machine fault. See 6.4.
4.3 Documents, jobs, and the bed
Three things that are easy to conflate:
The document is what you are drawing — artwork, the artboard it sits on, and the processes. Editable, and yours.
The job is a document that has been sent, or is ready to be. It appears in Jobs with a state (Section 7.3). ⭐ A job is a record of what you actually ran, with the settings you used — which is why the Jobs list is worth more three months later than the file you drew it from. The file does not remember what worked.
The bed is your machine's real work area, and its size comes from the machine profile (Section 2.4). The artboard is drawn inside it.
⚠ The artboard is not the bed. A Library blank opens an artboard the size of the part — a 2″ × 1″ keychain, or a pint glass's unwrapped surface — not the size of your machine. That is deliberate: you are laying out the part, and where it sits on the bed is a separate question.
4.3.1 Where the job lands on the bed ⭐
That separate question, answered — because it is the one people get wrong most often.
The bed's origin is its top-left corner, and it is 0, 0. X runs right, Y runs down.
⭐ Whatever an object's X and Y say in the editor is exactly where it burns, measured in inches from that top-left corner. There is no second placement step and no "job origin" setting to get wrong: an object at X 5″, Y 3″ burns 5″ right and 3″ down from the bed's top-left corner. The artboard sits in that same corner — it is a drawing frame of a chosen size, not a sheet you slide around the bed.
So you position the job by moving the artwork, and you position the material to match it. The simulator shows exactly this, and says so along the bottom: Bed: 0,0 at top-left.
⚠ This is why a small artboard is not "the middle of the machine". Open a 2″ × 1″ keychain blank and the part is in the top-left corner of the bed, not the centre — because that is where the artboard is. If your material is in the middle of the bed, move the artwork to the middle of the bed, or use the camera to see where the material actually is.
⭐ Use the camera and the outline preview rather than arithmetic. Both answer "will it land on my material" directly, which is the question you actually have.
The one exception: Centering Point
Centering Point (also called Center Engraving) hands the placement decision to the machine instead. You pick an anchor — the artwork's centre, its left edge, and so on — and the machine positions the job around wherever its own centring point is set, typically where you jogged the head to.
⚠ ALPS does not move your artwork when you use it. The geometry is sent unchanged; what changes is a small instruction telling the machine which point of the artwork to hang the job from. That matters because it means the editor still shows the artwork where you drew it, and the machine decides where that ends up — so the preview and the outline are no longer a picture of the bed.
⛔ If you are not deliberately using Centering Point, leave it off and the simple rule above holds: what you see is where it burns.
4.4 Where settings come from
Speed, power and frequency reach a process from one of four places. In the order you should prefer them:
- Your own tested material in the Materials library — ⭐ the best source, because it was measured on your machine.
- A Library blank's linked settings — a starting point for that blank.
- Epilog's published tables — ⚠ per wattage. Check which column you are reading.
- Typed in by hand — fine while testing; save it once it works.
⚠ Nothing in this chain knows your machine's condition. Optics, alignment and age all move the result. Published settings are where you start; Material Test is how you finish.
⭐ Save what works. A material entry that reflects your machine, your stock and your lens is worth more than every published table put together, and it takes twenty minutes to earn once.
Next: Section 5 · Artwork