QR / Barcode
Tools ▸ QR / Barcode · any machine
What it does
It builds a tag — a scannable code, text, a date, a serial number, or several of those together — and lays it out at the physical size you are going to engrave.
⚠ It opens as the Tag Builder inside the Job Editor, not as a separate window. That is on purpose: a tag is a job, and you will want the rest of the editor around it.
The code arrives as real vectors, not a picture. That matters: a code pasted in as an image engraves as dithered dots and scans badly, while vectors have crisp edges at any size.
The three steps
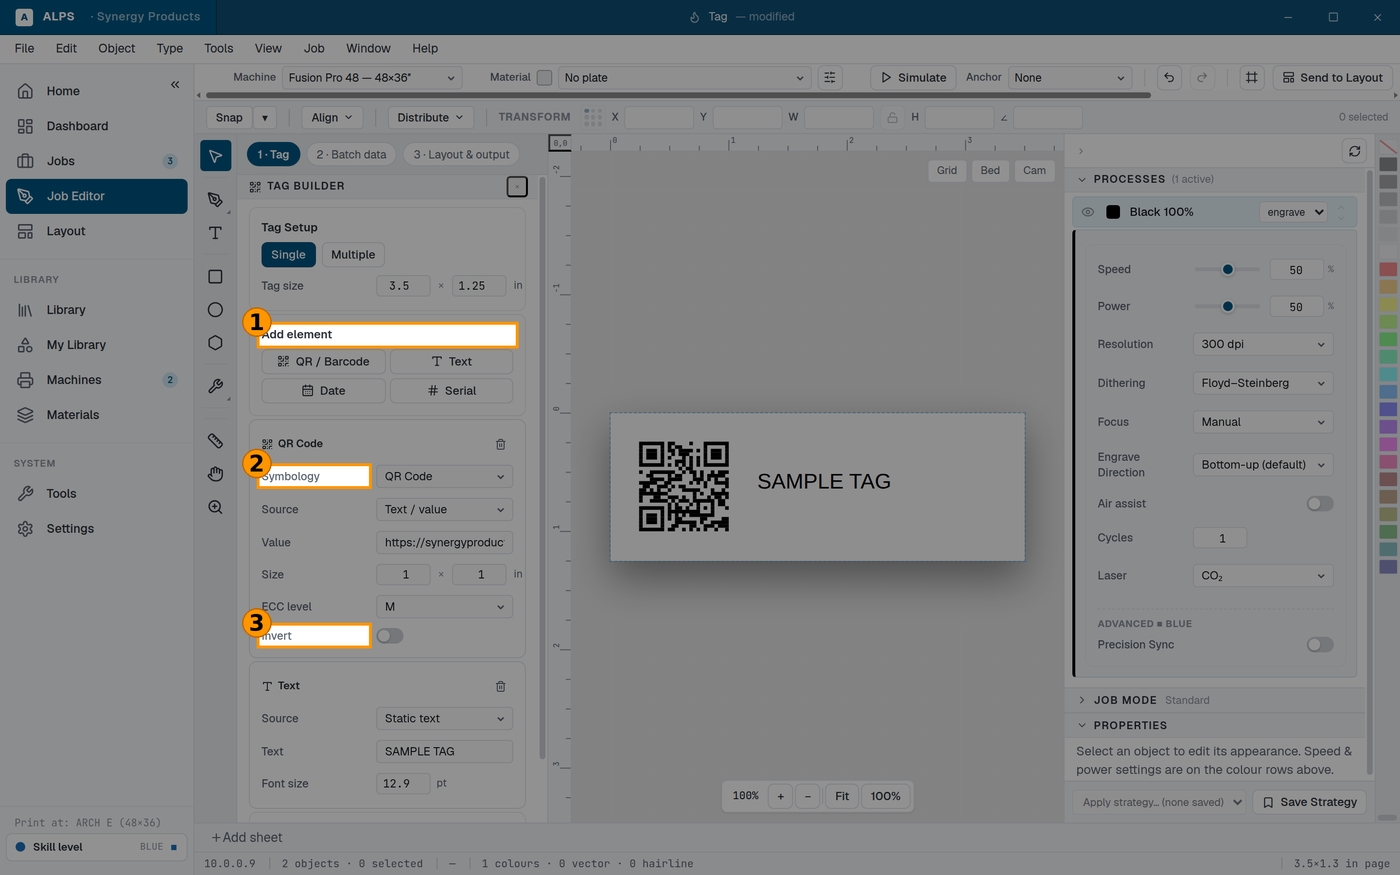
① Add element — a code, text, a date or a serial, on one tag ② Symbology — QR, Data Matrix, Code 128 or Code 39 ③ Invert — turn on for dark material, or the code will not scan
The Tag Builder works in the order across the top:
- Tag — what is on it.
- Batch data — where the values come from, if each tag differs.
- Layout & output — how they are arranged on the material.
For a single tag you only need step 1.
Step 1 — Tag Setup
Single or Multiple, and the Tag size in inches. Set the size first: everything you add is placed inside it.
Adding what goes on the tag
Add element gives you four:
| element | what it is |
|---|---|
| QR / Barcode | the scannable code |
| Text | a name, a title, anything fixed or fed from data |
| Date | the date, formatted |
| Serial | a number that advances per tag |
You can add more than one — a code and a name on the same tag is the common case.
The code itself
Symbology — QR Code, Data Matrix, Code 128 or Code 39.
| pick | when |
|---|---|
| QR Code | phones. Anything a customer scans with a camera |
| Data Matrix | small parts — it packs into less space, and is the industrial standard for direct part marking |
| Code 128 | a linear barcode carrying letters and numbers |
| Code 39 | a linear barcode where an older scanner or system requires it |
Source — where the code's content comes from:
- Text / value — you type it.
- Batch column — a column of your batch data, so every tag differs. See step 2.
- URL — a web address.
- vCard — contact details, so a scan saves a contact.
⭐ vCard is the one people do not know to ask for. An engraved metal business card that saves the contact when scanned is this dropdown and about a minute.
Size in inches, ECC level, and Invert.
The two settings that decide whether it scans
ECC level — error correction: how much damage, dirt or fill-in the code survives before it stops reading. L / M / Q / H, increasing. Higher survives more but packs a denser pattern into the same space. ⭐ M works for most jobs. Go to Q or H for something handled, oiled, or engraved on a surface that fills in.
Invert — swaps light and dark. ⚠ Turn it on when the laser reveals a lighter colour than the surface — anodised aluminium being the common case. Scanners expect dark modules on a light background; engrave a normal code onto dark anodised and you have made its photographic negative, which will not scan. This one toggle is the most common reason a code comes off the machine unreadable.
Text and serials
A Text element takes its Source from static text, the Code value (so the human-readable line always matches the code), or a Column of batch data.
⭐ "Code value" is worth knowing. It guarantees the printed number and the encoded number cannot drift apart, which is exactly the mistake nobody catches until a customer scans one.
A Serial element advances per tag — Start / step, a Format, and an Offset. It pairs with Mark Verification for a run that has to be provably complete.
⛔ Test the code before you run fifty
Scan the first one with an actual phone, off the actual material, before committing a batch.
A code that fails does so for physical reasons a preview cannot show: too small for its module size, contrast too low, a surface too shiny to read at an angle, or engraved edges that bled together. All of those look perfect on screen.
Related
- Variable Data and step 2 — a different code on every part.
- Mark Verification ◆ — reads an engraved code back and pass-fails it, for when a customer requires proof every part scans.