3D Engraving
Tools ▸ 3D Engraving · fiber galvo only · shipped in ALPS 0.1.196
What it does
3D Engraving carves a relief — a raised, shaped surface — into metal, from an ordinary greyscale image or an STL. Light areas of the picture become high ground, dark areas become deep. ALPS slices that into many shallow passes and sends them as one job, deepest area first, with cleaning passes built in.
The result is a part you can run your thumb over and feel the shape in, not an engraved picture of one.
Why you'd want it
It is the thing most laser software either cannot do or hides behind a wall of numbers. Done by hand it means working out how many passes, how deep each one goes, when to stop and clear the debris out, and re-typing a dozen machine parameters — for every job, on every material. Get one of them wrong and you have spent forty minutes turning a good blank into scrap.
ALPS asks you for the picture and the material, and works the rest out.
Before you start
- A fiber galvo machine. This is not a CO₂ tool. The panel will tell you if the selected machine cannot do it.
- A depth map or an STL. A depth map is just a greyscale picture where brightness means height — white is the top of the relief, black is the bottom. Photos usually need converting first; a purpose-made depth map works far better than a photograph.
- A blank you can afford to lose. The first attempt on an unfamiliar material is a test, not a part.
Step by step
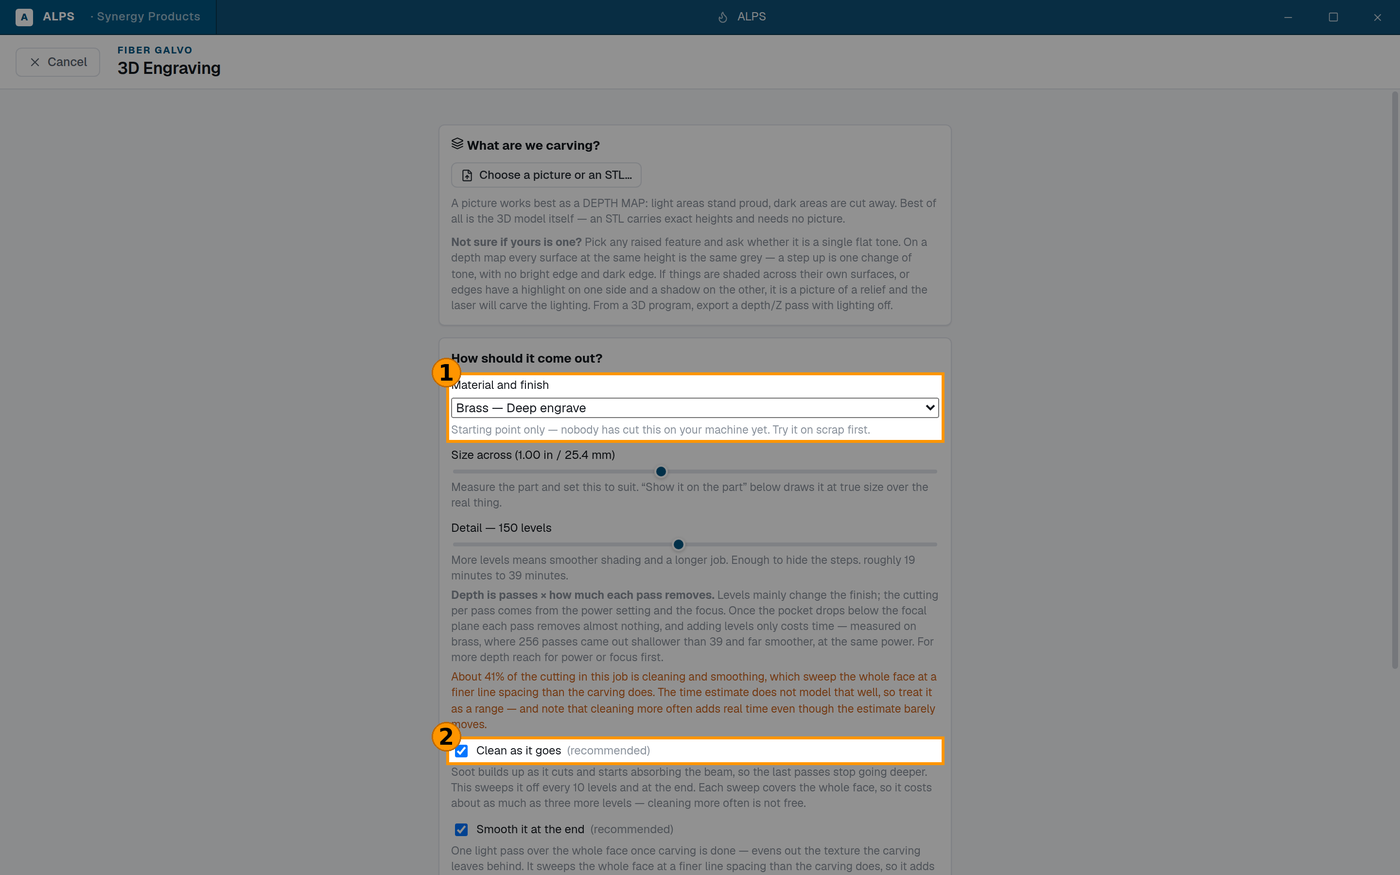
① Named starting points — you pick a material and finish, not a waveform index ② Clean as it goes — soot absorbs the beam, so late passes stop cutting deeper
- Open Tools ▸ 3D Engraving.
- Load your depth map or STL.
- Pick the material from the list. This is the important one — it sets the machine parameters for you. See Why there are no numbers below.
- Check What will be carved — the preview shows what ALPS understood from your image. If it looks like a flat grey slab, the image is not a depth map. Use Preview height to make the 3D inspection surface easier to read. It is a unitless display adjustment only: it does not change the depth map, passes, or physical cut depth, and resets when ALPS restarts.
- Tick It's a round part if you are engraving a cylinder rather than a flat face.
- Make the job. ALPS slices it, encodes it, and puts it in your job list marked Ready to send.
Nothing in this tool talks to the laser. You send the job when you are ready, like any other.
Why there are no numbers
The machine wants a waveform index and a frequency percentage. Those are real values and they are what gets sent — but they are meaningless to almost everyone, and two of them are actively misleading:
- "Frequency" is a percentage, not kHz. It is a percentage of the band that the selected waveform happens to cover, so the same number means a different frequency on a different waveform. Set one from memory and you can be off by ten times without any warning.
- A lower waveform number is not "gentler". On this hardware the lowest index is the deepest-cutting.
So the main path is a named material, taken from settings that have been run on real metal. If you want the raw values they are all there under Show the numbers — nothing is hidden, it is just not the first thing you are asked for.
Levels: the dial people get wrong
Levels is how many slices the relief is cut into.
⚠ Depth and detail are not the same dial, and this is the single most common mistake. Making each pass more aggressive gets you deeper — it does not get you a better-looking relief. Fine detail comes from many levels, each removing very little. A deep, coarse relief and a shallow, crisp one can take the same time.
ALPS tells you what your setting will look like as you move it:
- below about 60 levels, you will be able to see the steps
- above that, they blend into a smooth surface
It also warns you when the pulses are only just overlapping, which is where the surface starts to look grainy rather than machined.
Carve, clean, finish
A real relief is not one operation. ALPS builds three roles into the job:
| role | what it is for |
|---|---|
| carve | removes the bulk of the material, deepest area first |
| clean | interleaved between carving passes, clearing re-deposited debris |
| finish | the final surface passes |
The cleaning is the part people leave out. Ablated metal does not vanish — it settles back onto the surface you are still cutting, and every pass after that is cutting through it. Without cleaning, a relief goes cloudy and stops getting deeper no matter how many passes you add.
What a real job looks like
A 1-inch relief carved on the demo machine: 19 levels, 6 minutes 35 seconds, correct topography throughout — deepest at the rim, raised where it should be raised, recessed where it should be recessed.
⚠ Treat that as an illustration, not a recipe. Your material, lens and blank thickness all move it.
If it does not look right
| what you see | what it usually is |
|---|---|
| preview is a flat grey slab | the image is not a depth map — brightness has to mean height |
| visible stepping | not enough levels — raise it above ~60 |
| grainy, unmachined surface | pulses barely overlapping — the panel warns about this |
| stops getting deeper | debris, not power — the cleaning passes are what fixes it |
| the tool refuses the machine | it is fiber galvo only |
Related
- Material Test (Tools ▸ Material Test) — burns a speed × power grid to dial in a material before you commit a real blank to it.
- Fixture Maker (
fixture-maker.md) — for holding awkward parts in place if you are running more than one.